Fixed-Size Array and Linked List
In this lesson we will detour a little bit to discuss two kinds of list. One is a Fixed Size Array and the other one is a Linked List. Both are list but they have their differences.
Goals
By the end of this lesson, you should be able to:
- implement Array and Linked List data structure from the same base class.
abstract data type, list, fixed size array, linked list
Fixed-Size Array
Python does not have a fixed-size array data type. One of the most basic data type in Python is a list. However, many programming languages like C/C++ and Java have this more basic and primitive list-like data type. In these programming languages, you need to declare the size of the array and its type. For example, in C or Java, it will look something like:
int mynumber[10];
Such declaration reserves 10 spaces in the memory to store an array of int type. If one int number takes 32-bit (32 digits of 0s and 1s), then the program reserves 10 spaces of 32-bit in the memory as shown in the figure below.
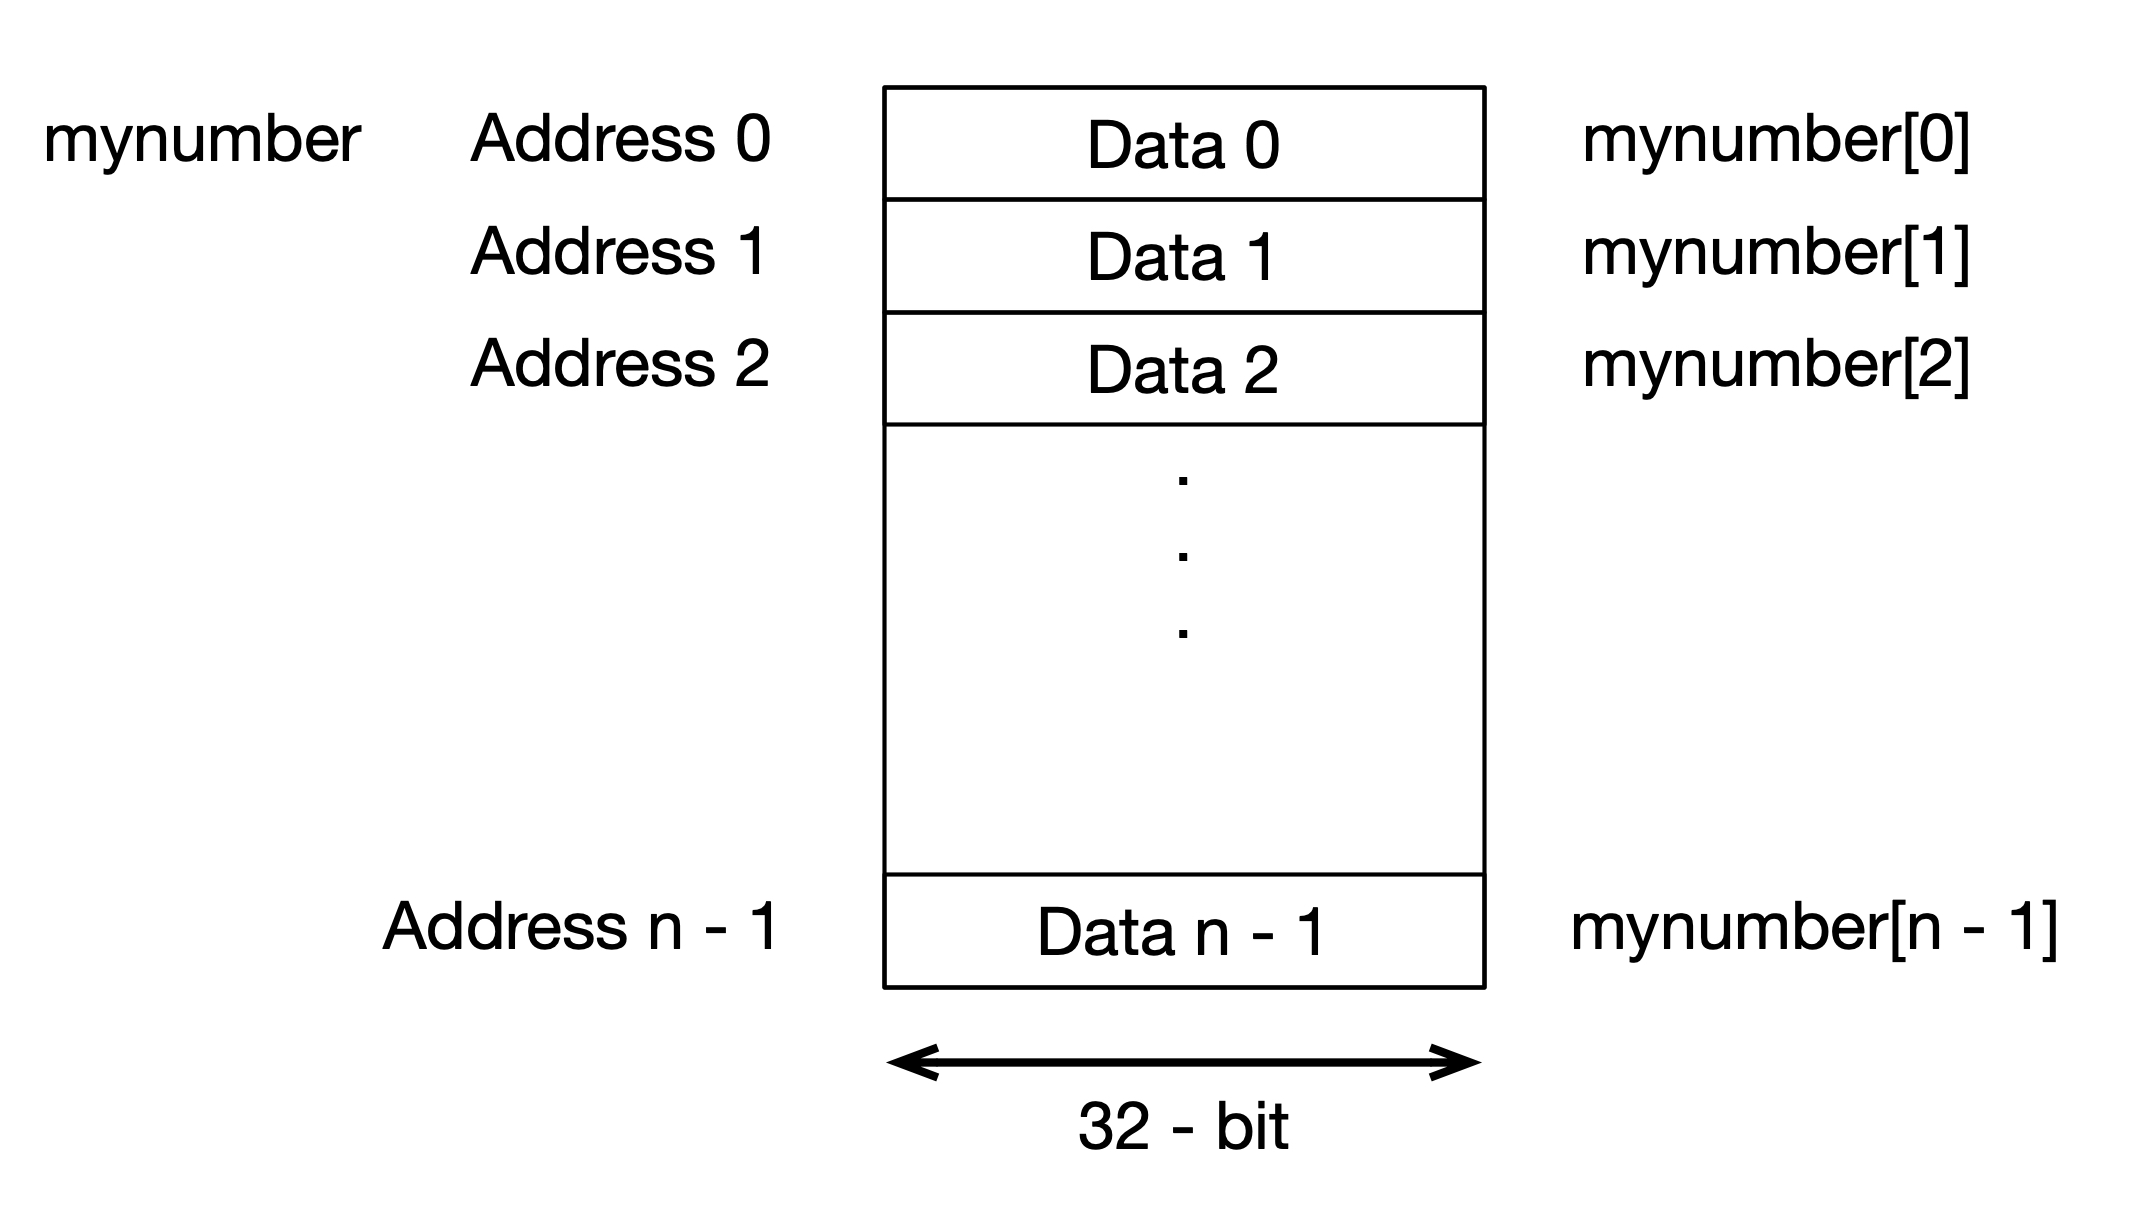
Once it is declared to have 10 spaces, the array cannot be extended. You need to reallocate the memory if you have more numbers than what is declared. Moreover, each element has the same data type. The consequence of this is that each element occupies the same size in the memory. Since it occupies the same size, it is easy to know where the other data are. The advantage of this way of creating an array is that it is fast and simple.
Though Python does not have such fixed-size array, Numpy library implements something similar in its Numpy's array. For example, numpy array must have the same data type. The difference, however, you can extend the numpy array and you need not declare how many elements are there in the array.
The above code shows how to create a numpy array using np.array(). It takes in a list as its argument. Numpy will try to detect the data type and in the example above it was detected as int64 which means a 64-bit integer.
If one of the array is a float, Numpy will consider all elements as the float.
As shown in the output, all the elements are printed as a float and the type was detected as float64, which is a 64-bit float data type.
Numpy provides additional functionalities to manipulate array such as to append or to insert as shown above.
List Using Fixed-Sized Array
In your problem set, you will create your own list based on a fixed-array of Numpy called. You can define a new class, say ArrayFixedSize that uses Numpy's array as its internal storage to "simulate" a fixed array in Python. So objects of ArrayFixedSize must be declared with its size and its data type. Moreover, you will work on create a list-like data type called MyArrayList that is based on ArrayFixedSize. In this case, MyArrayList works like Python's built-in list where you can append elements to the list. However, since ArrayFixedSize has a fixed size, you need to write some codes to create new array with bigger memory size when it is already full.
Adding an Element When Array is Full
Initially, when the list is created, MyArrayList will create an empty array with some fixed initial size, say 16 elements. When all the 16 elements are filled up, and a new data is appended, MyArrayList will double the size to 32 elements and put the new data at the next empty position. See figure below.
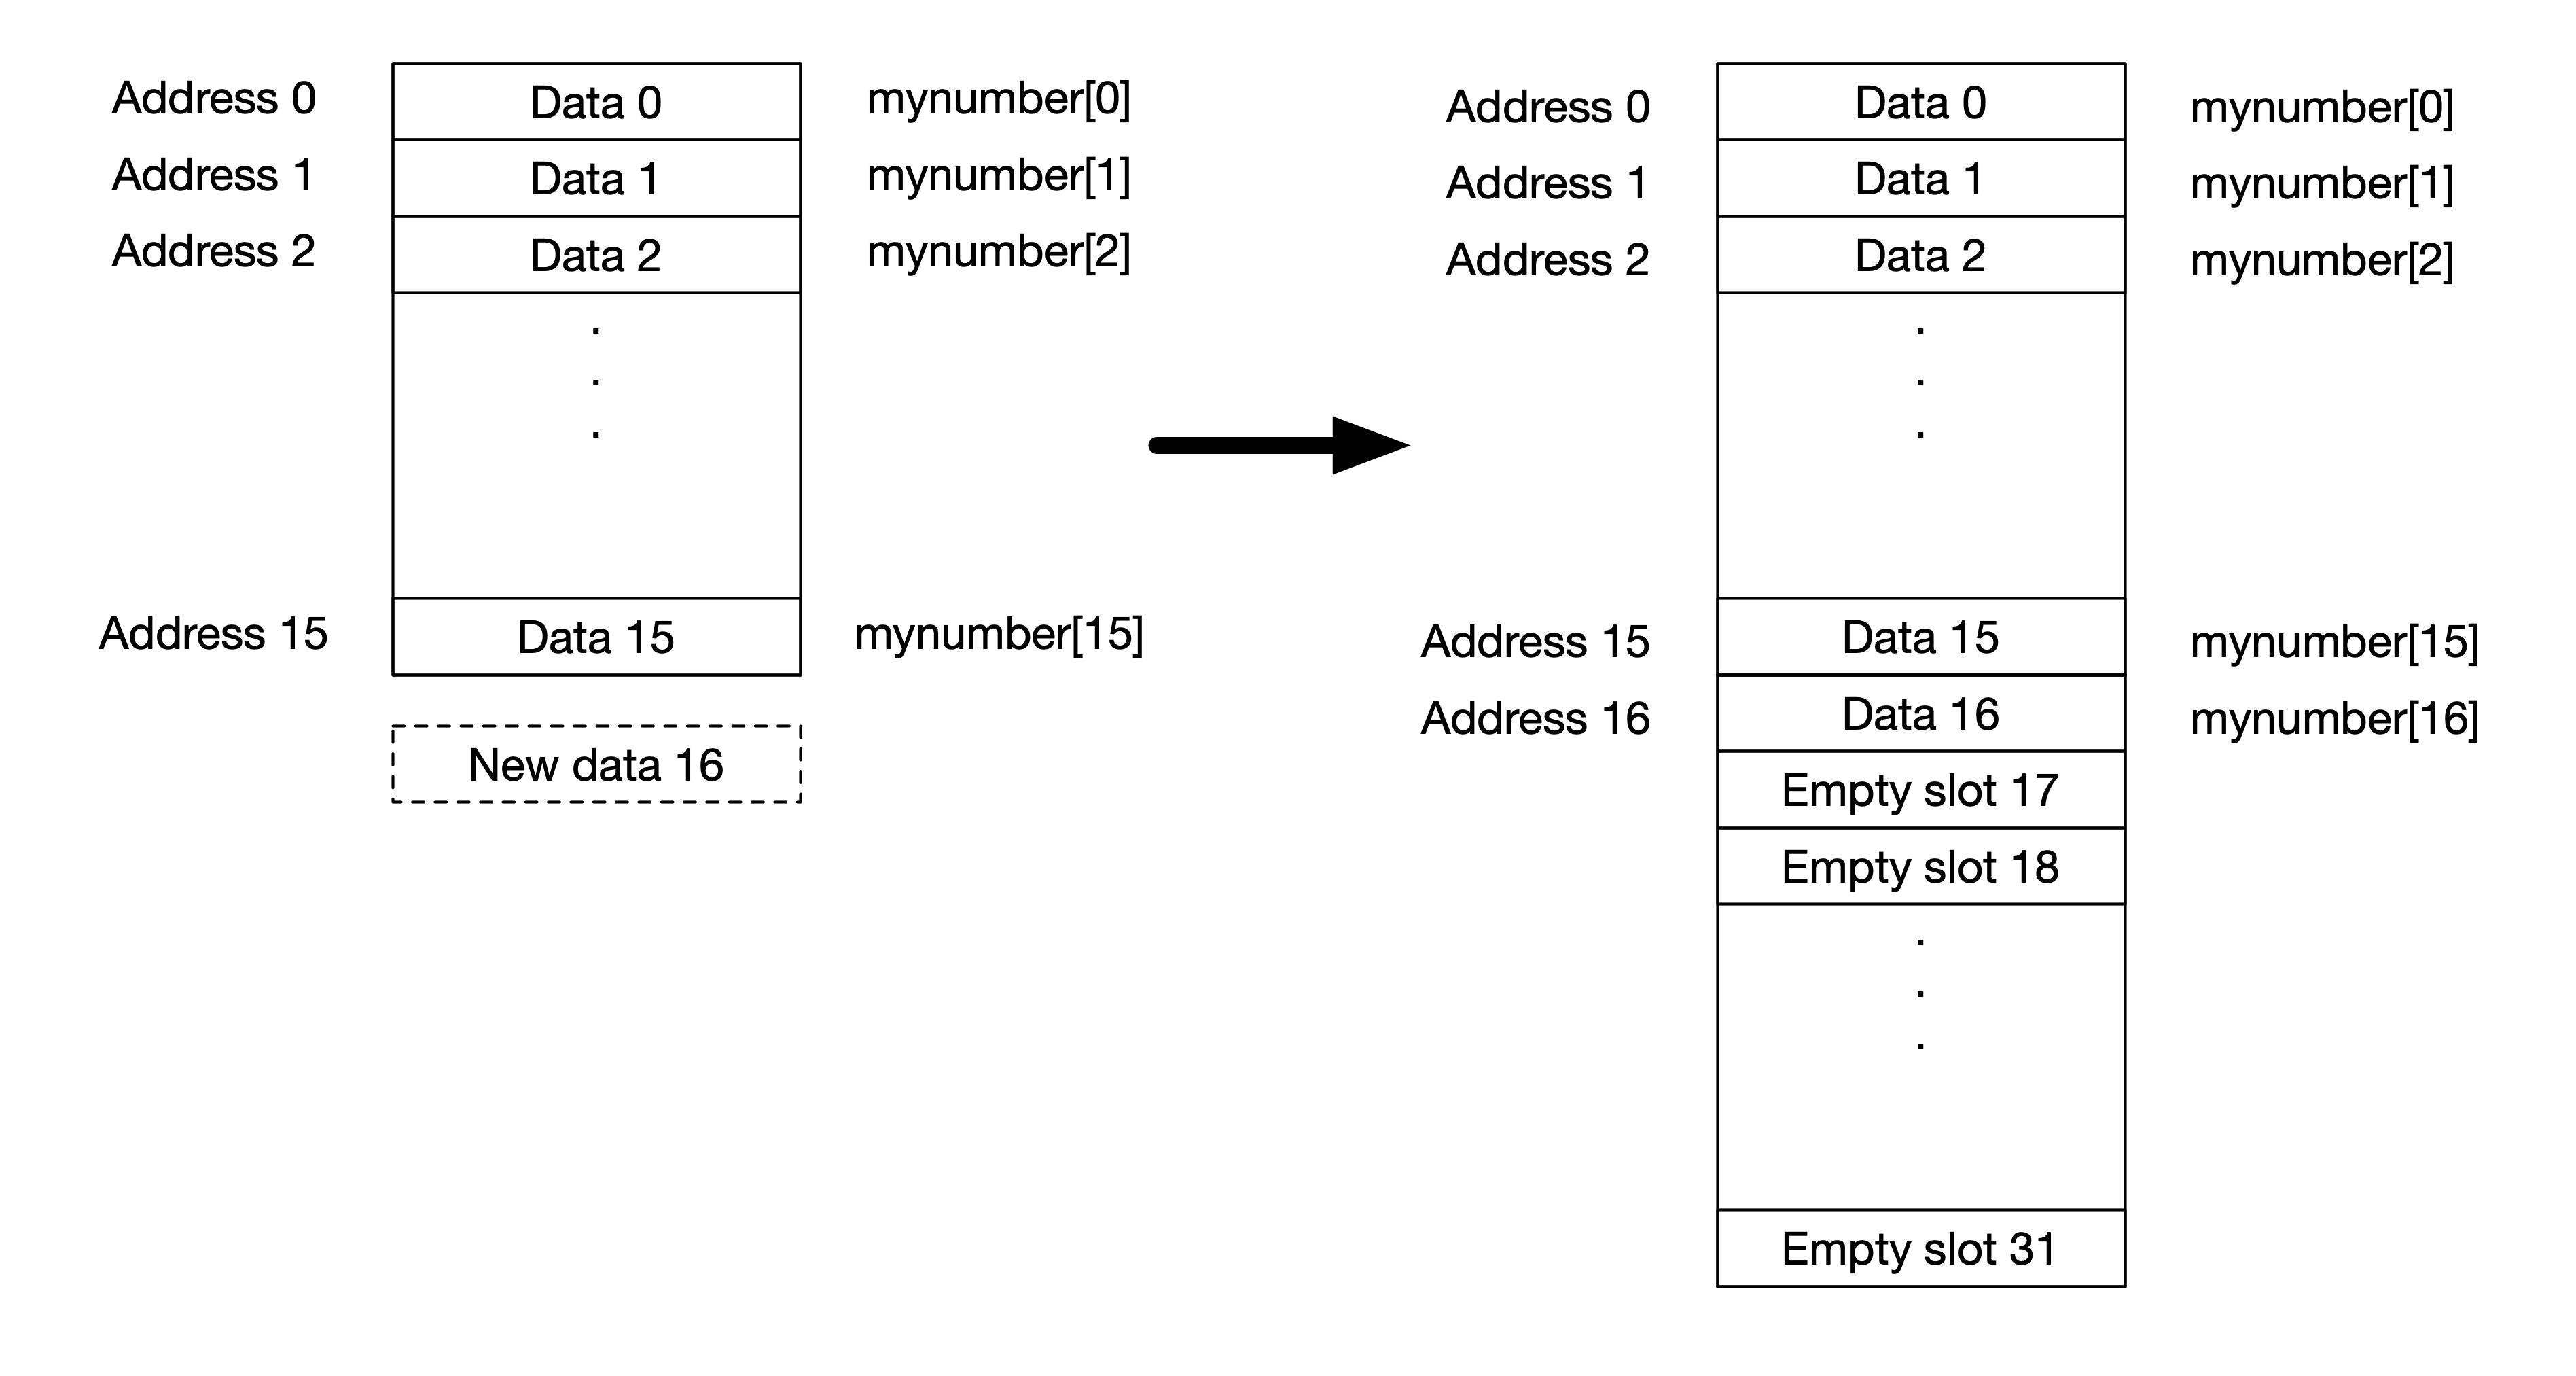
This is one way to work. The disadvantage of this method is that we always have to reserve extra memory space to work. For example, we have 17 elements, we actually reserving 32 spaces where the other 15 positions are empty. The advantage is that since the size is fixed for each element, it is easy to locate the data at any position using its index. Later on, we will consider a different way of creating a list using Linked List.
Inserting and Removing an Element
What can we do to insert an element into a list made with fixed-size array? To insert one element, one can first check if there is enough space in the allocated memory. If there is not enough space, we can double the size of the array as in the case of adding an element at the end. If there is enough space for one more element, then no doubling of memory is needed and we can just shift all the element to the right by one position and insert the element at the position we want it. This is illustrated in the figure below.
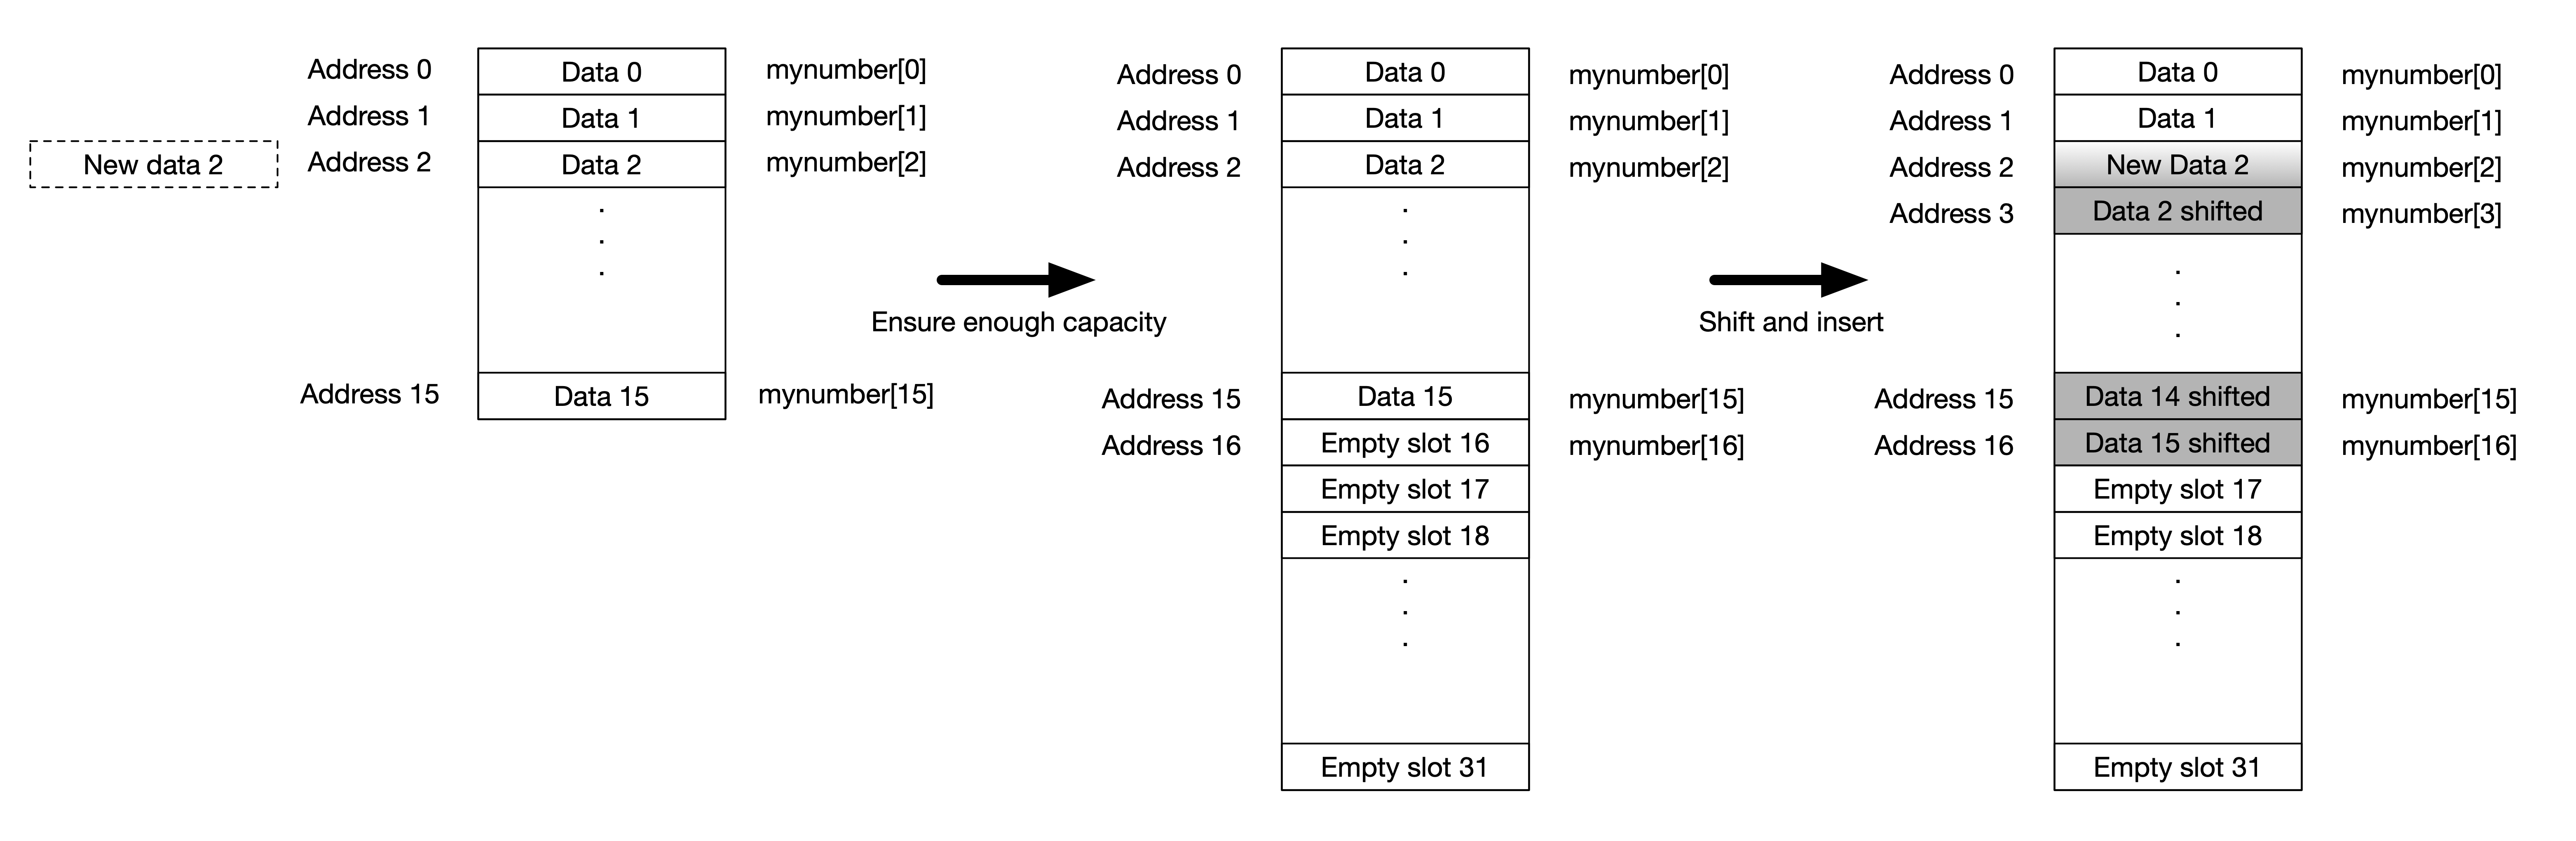
The above figure shows what happens when we insert the data at position 2 (third position). Assuming that the array is already full, we need to ensure that we have enough capacity to insert a new element. Therefore, we first need to increase the memory size by doubling the array. Once there is enough space, we shift all the elements to the right and modify the value of the element at position 2 (third position).
What is the computational complexity of such a process? To create a new array with double the size and copy the old values to the new array takes time. Furthermore, shifting the values by one in the worst case scenario takes time and modifying the value takes constant time, i.e. . So we should expect such insert operation takes linear complexity.
Removing an element is similar. We can simply shift left all the elements by one position. Depending on the design, we may want to choose to keep the empty space available once we reserve it. This, however, may not be a preferred option in systems with small memories like embedded systems.
Linked List
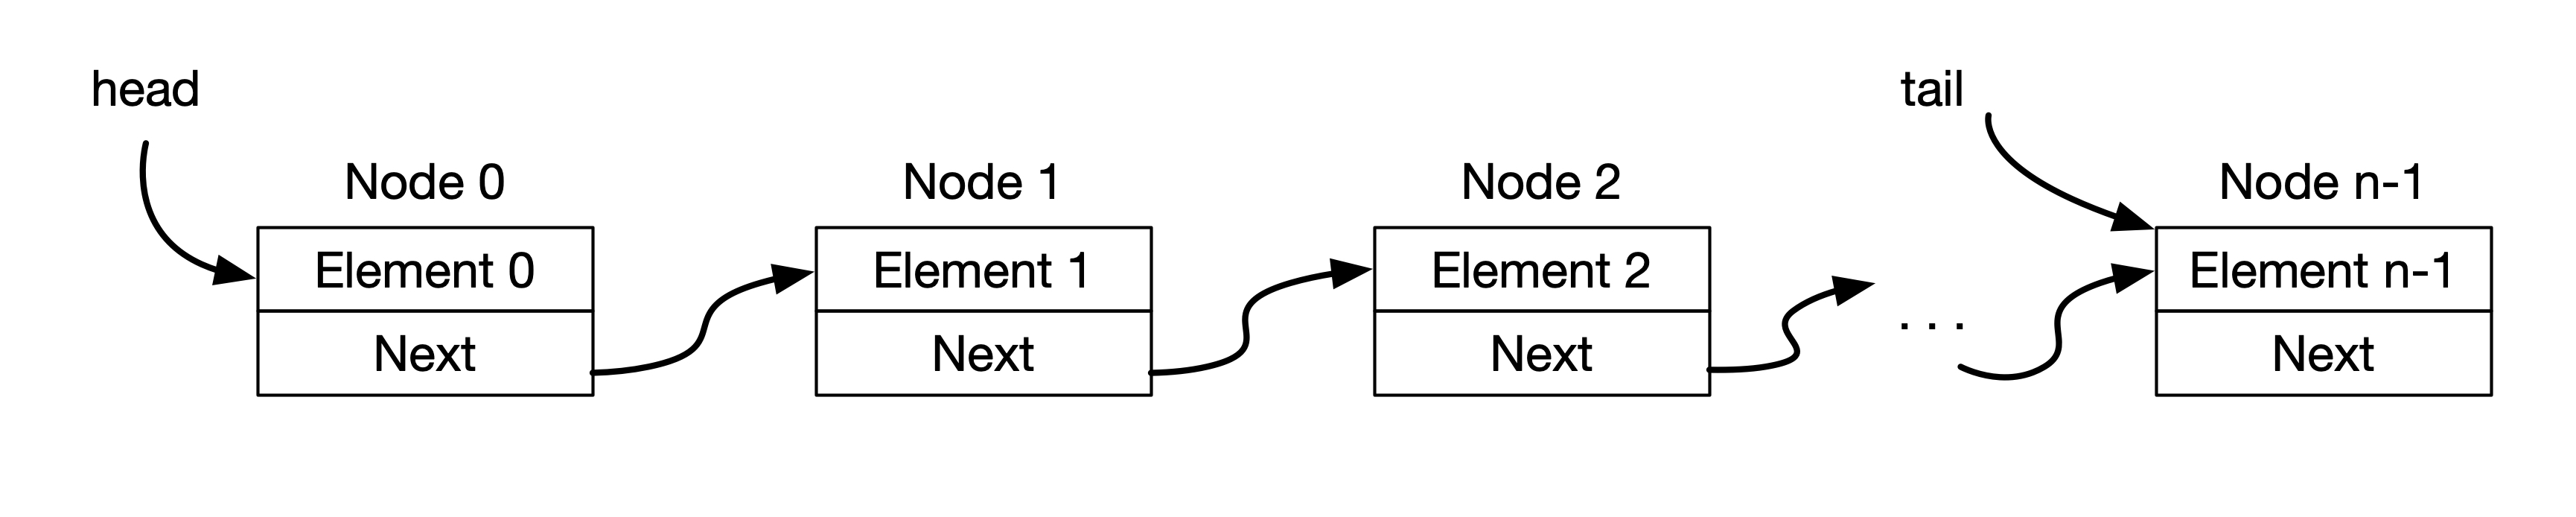
Now, let's take a look at another alternative of creating a list besides using Fixed-size array. Instead of just storing the element, a Linked List stores more information in one node. In a linked list, each node contains the following:
- the element
- and the reference to the next element
The linked list itself stores references to two nodes:
- the head of the list
- the tail of the list
This is shown in the figure below.
Notice that the element itself can be a reference to another object. This arrangement allows several flexibility. First, the element can be objects of different sizes. Since the way to get to some element is through the next references, there is no constraint that the element must be of the same size. Moreover, you can add new element as needed by creating a new node and point the tail to the new node and the last element's next reference to this new node. In this way, you need not reserve any empty memory space as in the fixed size array. This arrangement also allows you to have a list with any size without declaring how many elements would be in the list.
The downside of this arrangement is that it is slower than the fixed size array. In a fixed size array, it is fast and simple to access the element at a particular position using the index since the size of each element is the same. We can get the position of element i from:
However, with linked list, we have to traverse the nodes to reach the element that we want and this is slower than just computing the exact location.
Inserting an Element
Now, let's discuss the operation of inserting and removing an element from a linked list. We divide such operations into three categories:
- at first position
- at last position
- at position between the first and the last
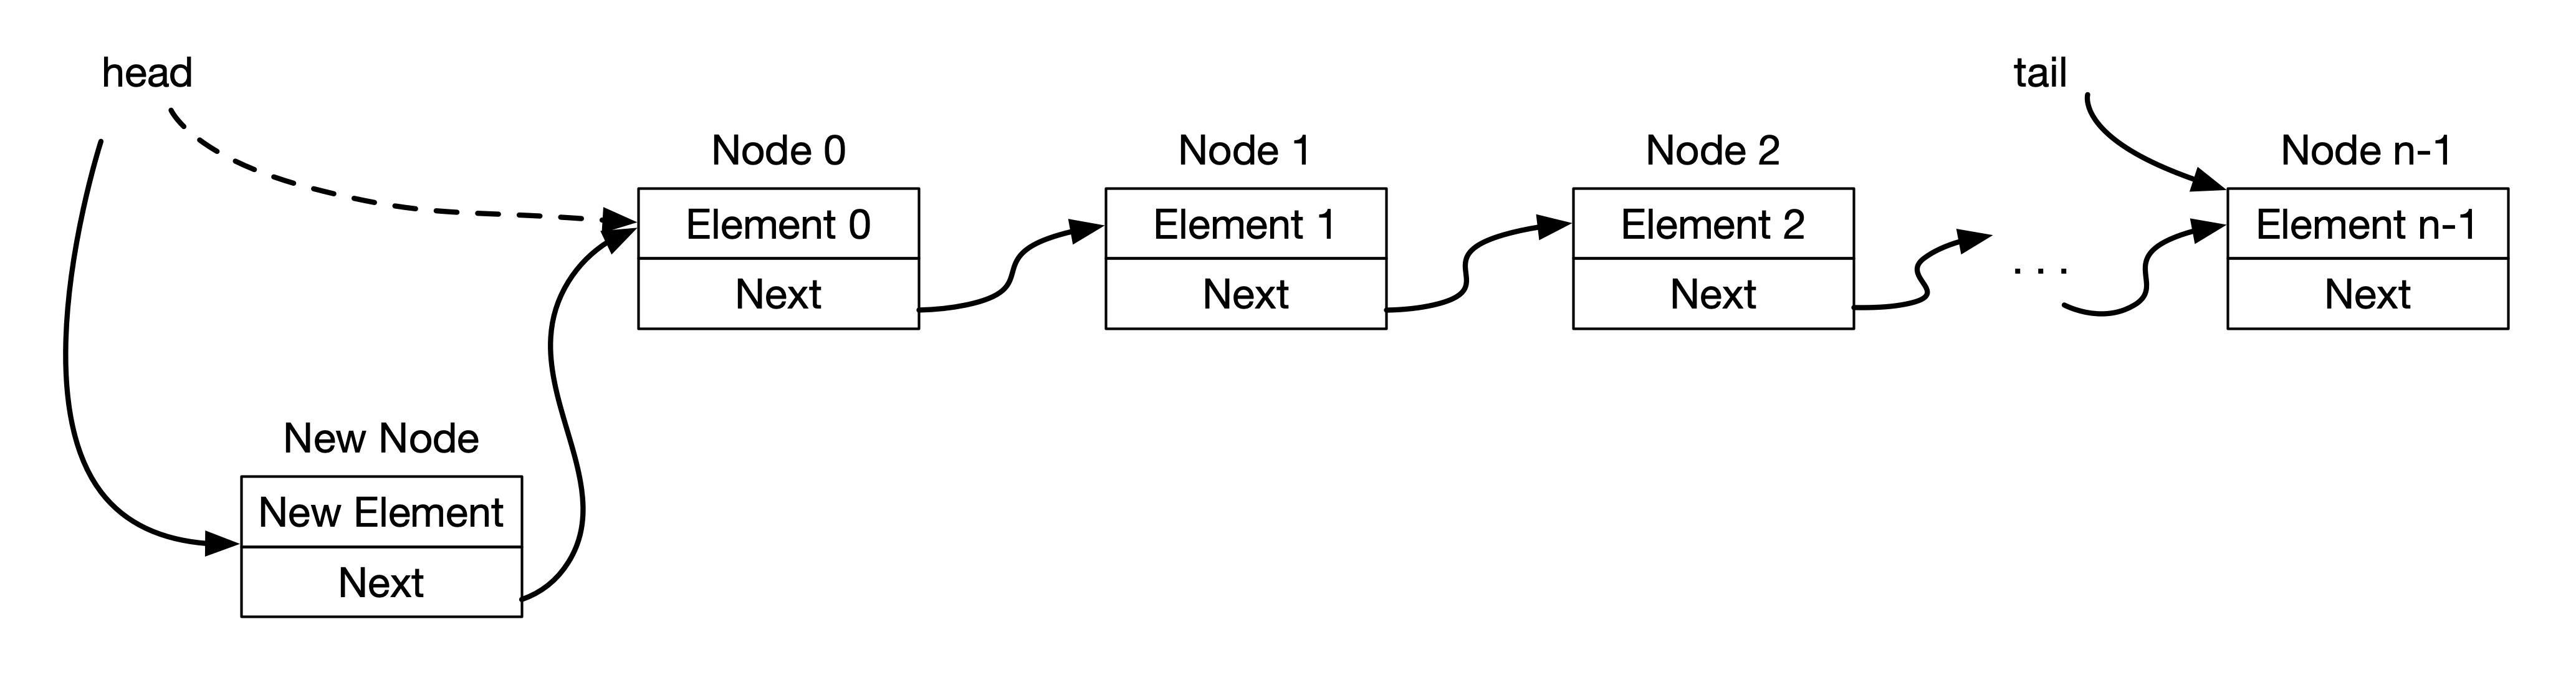
Recall that a linked list has references to the first and the last node. To insert a new element at the first position, we do the following:
- Create a new Node with the new element.
- Set the first node (i.e the current head) as the next reference of the new node.
- Set the new node as the head of the linked list.
This is shown in the figure below.
Inserting at the end of the linked list involves similar process:
- Create a new Node with the new element.
- Set the new Node as the next reference of the tail of the linked list.
- Set the new Node as the new tail of the linked list.
The only tricky thing is when the linked list is empty. In this case, the tail will refer to a NIL. In this case we use the new Node as both the head and the tail of the linked list.
If we wish to insert an element in between the first and the last position, we first need to traverse the linked list to that particular position. We then do the operation as shown in the figure below.
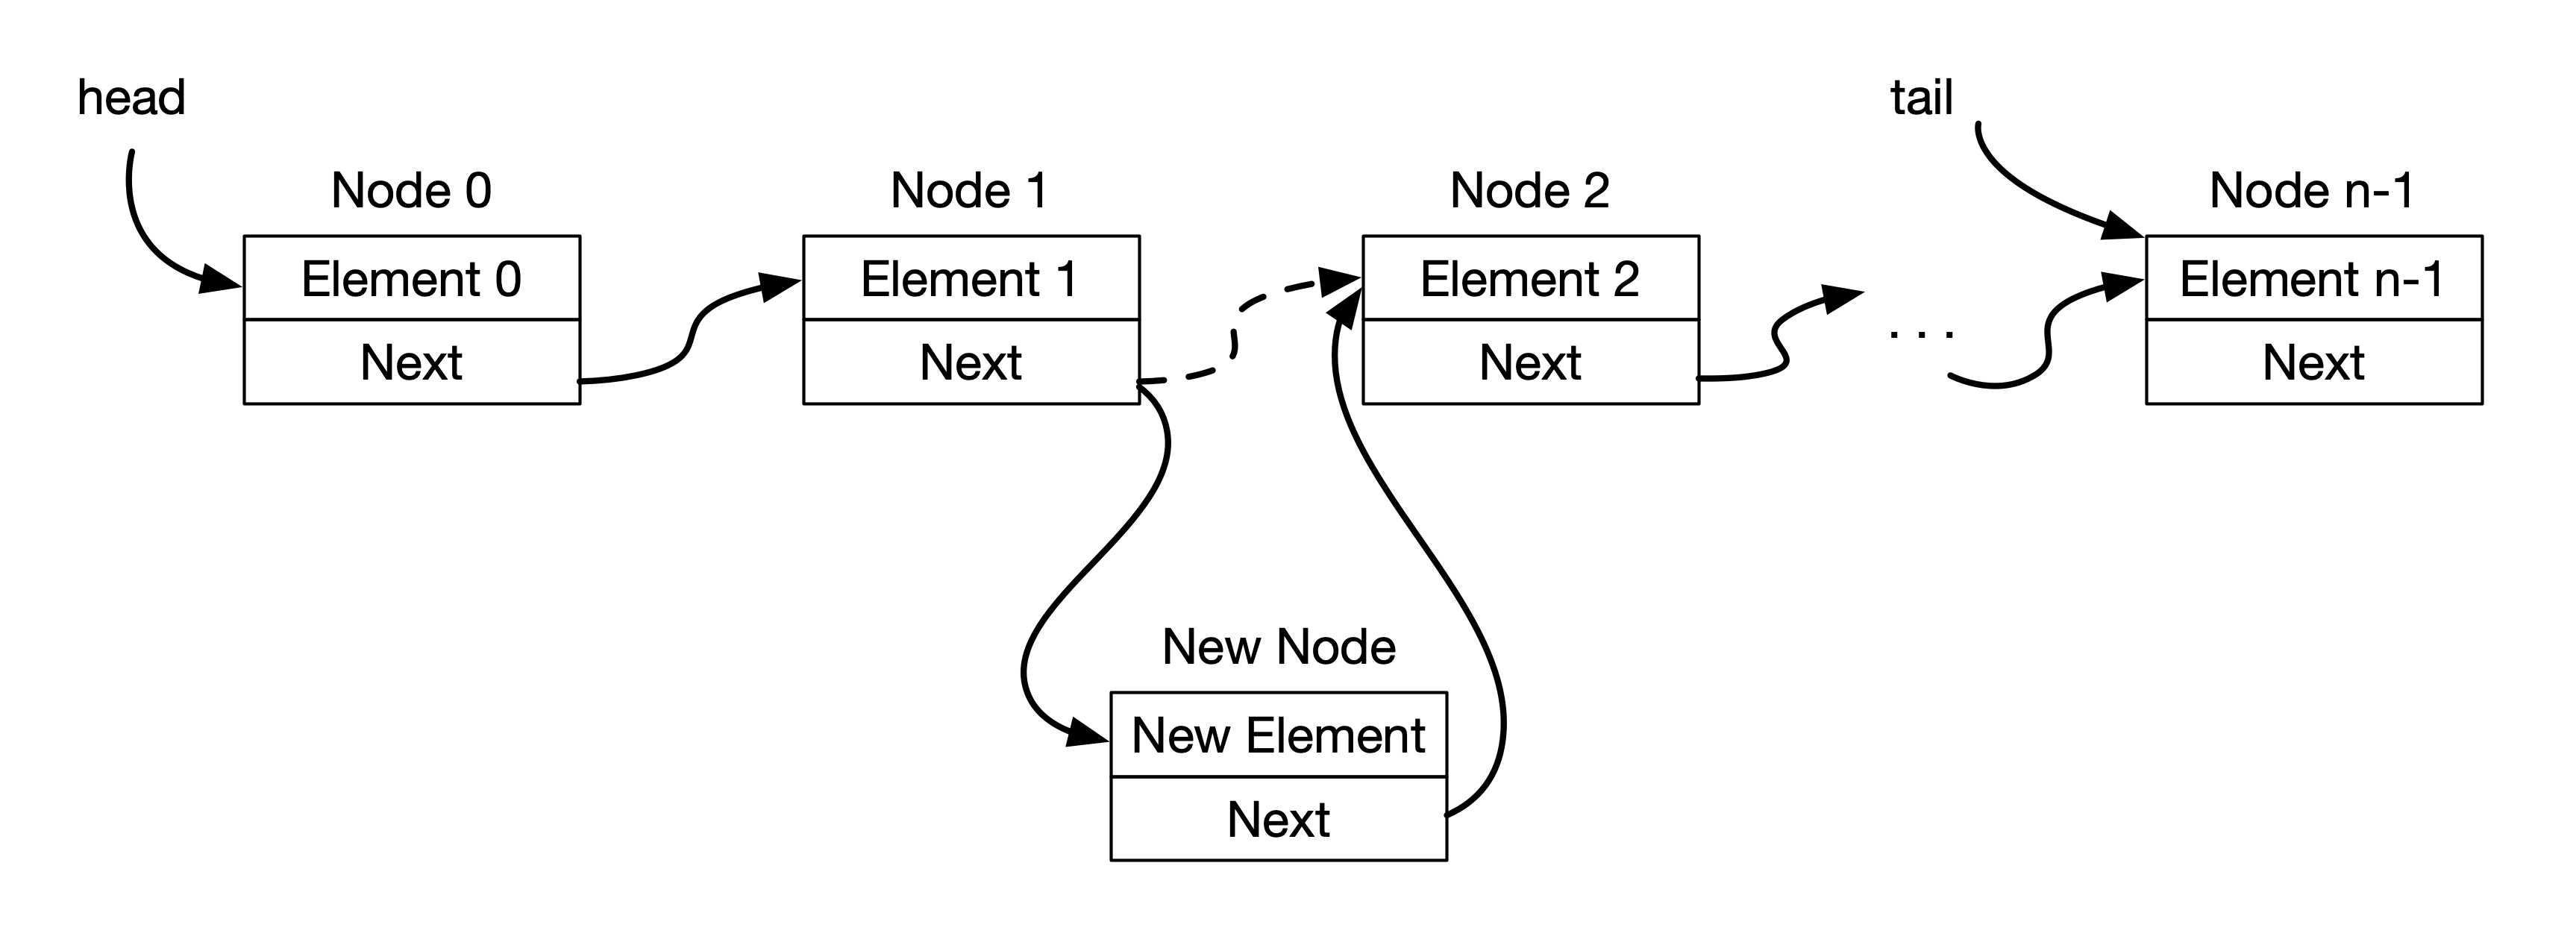
In the above figure, we insert a new element at position 2 (third element). In order to do so, we do the following:
- Traverse up to Node 1.
- Create a new Node.
- Get the next reference of Node 1 and set it as the next reference of the newly created Node.
- Set the next reference of Node 1 to point to the newly created Node.
What is the computational time of inserting an element. The worst case is when we insert a new element to the second last position. In this case, we have to traverse to the node before the tail which takes time. The other operations takes constant time. Therefore, overall, inserting an element takes linear time, i.e. .
Removing an Element
Removing an element also can be categorized into these three positions: first, last, or in between the first and the last. Let's start for the case when we remove the first element. This is shown in the figure below.

In this case, we do the following:
- Store the head into a temporary node variable
- We get the next reference of the temporary node and set it as the new head
- We can store the element of the temporary node so that we can return it at the end
- Now, we can delete the temporary node, and
- return the element of the deleted node
In the case of removing the last element:
- we first need to traverse to the node before the tail, set this as the current node.
- Set the current node as the new tail.
- Set the next of the new tail to NIL.
- We can store the element of the deleted node.
- Delete the node and return the element only.
Lastly, we need to consider the case when we remove an element which position is in between the first and the last. This is shown in the figure below.

In the above figure, we remove element at position 1 (second position). To do this, we follow the following steps:
- Traverse the nodes until the node before (i.e. Node 0 in this case) and set it as the current node.
- Save the next of the current node into a temporary variable. This is the deleted node.
- Set the next of the deleted node as the next of the current node, i.e. Node 2 as the next of Node 0 in the figure.
- Delete the node and return the element only.
Since removing node involves traversing the linked list, the worst case complexity will be linear, i.e. .
An Abstract Base Class for Our List
We have discussed two ways of implementing a list and each have its own advantages and disadvantages. For some application, one may choose to use a list based on fixed-size array, while for other applicaiton, one may choose to use a linked list. Both kinds of list, however, can be designed to implement the same operations. This is where our lesson on inheritance can be applied. We can design a base class for our list that is inherited by the two ways of implementing a list. The UML diagram is shown below.
In the UML above, we showed that `MyAbstractList` implements the Abstract Base Class of `Iterator`. To satisfies this, you need to define a method called `__iter__()` in `MyAbstractList` that returns an iterator object. The class `MyAbstractList` also defines some common property and methods for both `MyArrayList` and `MyLinkedList` such as:
size, which is an attribute that stores the number of items in the list.is_empty, which is a computed property that returns whether the list is empty or not.add(item), which adds an item to the end of the list.remove(item), which removes an item from the list.__getitem__(index), which allows you to use the bracket operator to get an item, e.g.mylist[index].__setitem__(index, value), which allows you to use the bracket operator and assignment operator to set a value at a particular index, e.g.mylist[index] = value.__delitem__(index), which allows you to use thedeloperator and the bracket operator to delete an item, e.g.del mylist[index].__len__(index), which is called when you use thelen()function on the list, e.g.len(mylist).
This class MyAbstractList is inherited by the two classes MyArrayList and MyLinkedList. The class MyArrayList is implemented using fixed-size array while MyLinkedList is implemented using a linked list. Since the implementation is different, the code to add and remove items for these two classes will be different. Therefore, the add(item) method in the MyAbstractList would call a method add_at(index, item) which is implemented in the child class MyArrayList and MyLinkedList. This means that both MyArrayList and MyLinkedList have add_at(index, item) method in their class definitions. However, the implementation of this method is different between the two classes.
Similarly, the remove(item) method would call a method remove_at(index) which is implemented in both the MyArrayList and MyLinkedList classes. The __getitem__(index) method is called either when you use the square bracket operator as in mylist[index] or the get method as in mylist.get(index). Since the way to access the element is different between the fixed-size array and the linked list, this method should be overridden in the child classes. Similarly, the method __setitem__(index, value) would have different implementation in the children classes. Therefore, our implemention of this method would call the method set_at(index, item) of the child class' method.
To summarize, we have implemented two kind of list classes. One is implemented using a fixed-size array while the other one is implemented using a linked list. Both classes inherit from a common base class called MyAbstractList which provides the common attributes, properties and methods that all list classes have. In this way, we do not duplicate the codes that are the same in MyArrayList and MyLinkedList. This common methods and codes are placed in the parent class MyAbstractList. Only the different implementation is defined in the child classes' methods. The class MyAbstractList inherits and implements Iterator class. This ensures that all our list are iterable. To implement Iterator class, we must define __iter__() method in our MyAbstractList which returns an iterator object. Both MyArrayList and MyLinkedList inherit this iterator method when they inherit from MyAbstractList.